Fast Tags | Set up Fast Tags
💡 Fast Tags are a powerful feature available for Shopify and WooCommerce that enhances your online store. Fast Tags help boost your website conversion by showcasing the speed of your delivery service, instilling trust in your customers. 💨
Don’t know what Fast Tags are? Discover the feature
Learn how to unlock this valuable feature in this article!
2. [Advanced] Manual placement setup
1. Fast Tags activation
a. Activate Fast Tags in Bigblue
- To activate Fast Tags, first, go to the Bigblue app and visit your Shop integration settings
- Click on the Fast Tags tab

b. Pick the default Fast Tags display method
- Following this, on the Fast Tags settings page, select your preferred display method

- Bigblue’s recommendation💙: start with “Above the “Add to cart” button” placement, then set up the badge (ETA preferences and branding). If you dislike the display, switch to “Manual placement,” which requires editing your store Theme (Advanced settings).
Bigblue provides two ways to display Fast Tags on your shop:
|
|
1/ Automatic placement [By-default mode] Above the “Add to cart” button |
2/ Manual placement |
|---|---|---|
| Description |
The by-default mode to start with Fast Tags. Activate Fast Tags in 1 click and get it automatically placed in your store. |
Advanced mode Choose where you display the Fast Tags badge. |
| Where the Fast Tags is displayed? |
• On your product pages • Before the Add-to-Cart button |
• On product pages, but also Cart pages, and Product lists (Woocommerce) • You decide where the badge is located |
| Compatible with |
Most standard stores *Automatic placement does not work on some themes. If that's the case you can use a Manual placement. |
All Shopify and WooCommerce stores |
| Setup | No code required | Requires to edit your store Theme |
| Customization | • Available! Customise background and accent colours, toggle the icon, and adjust badge corner radius.• Use CSS for advanced visual modifications. | • Available! Customise background and accent colours, toggle the icon, and adjust badge corner radius.• You can choose the exact location where Fast Tags appear on your page.• Use CSS for advanced visual modifications. |
Automatic placement
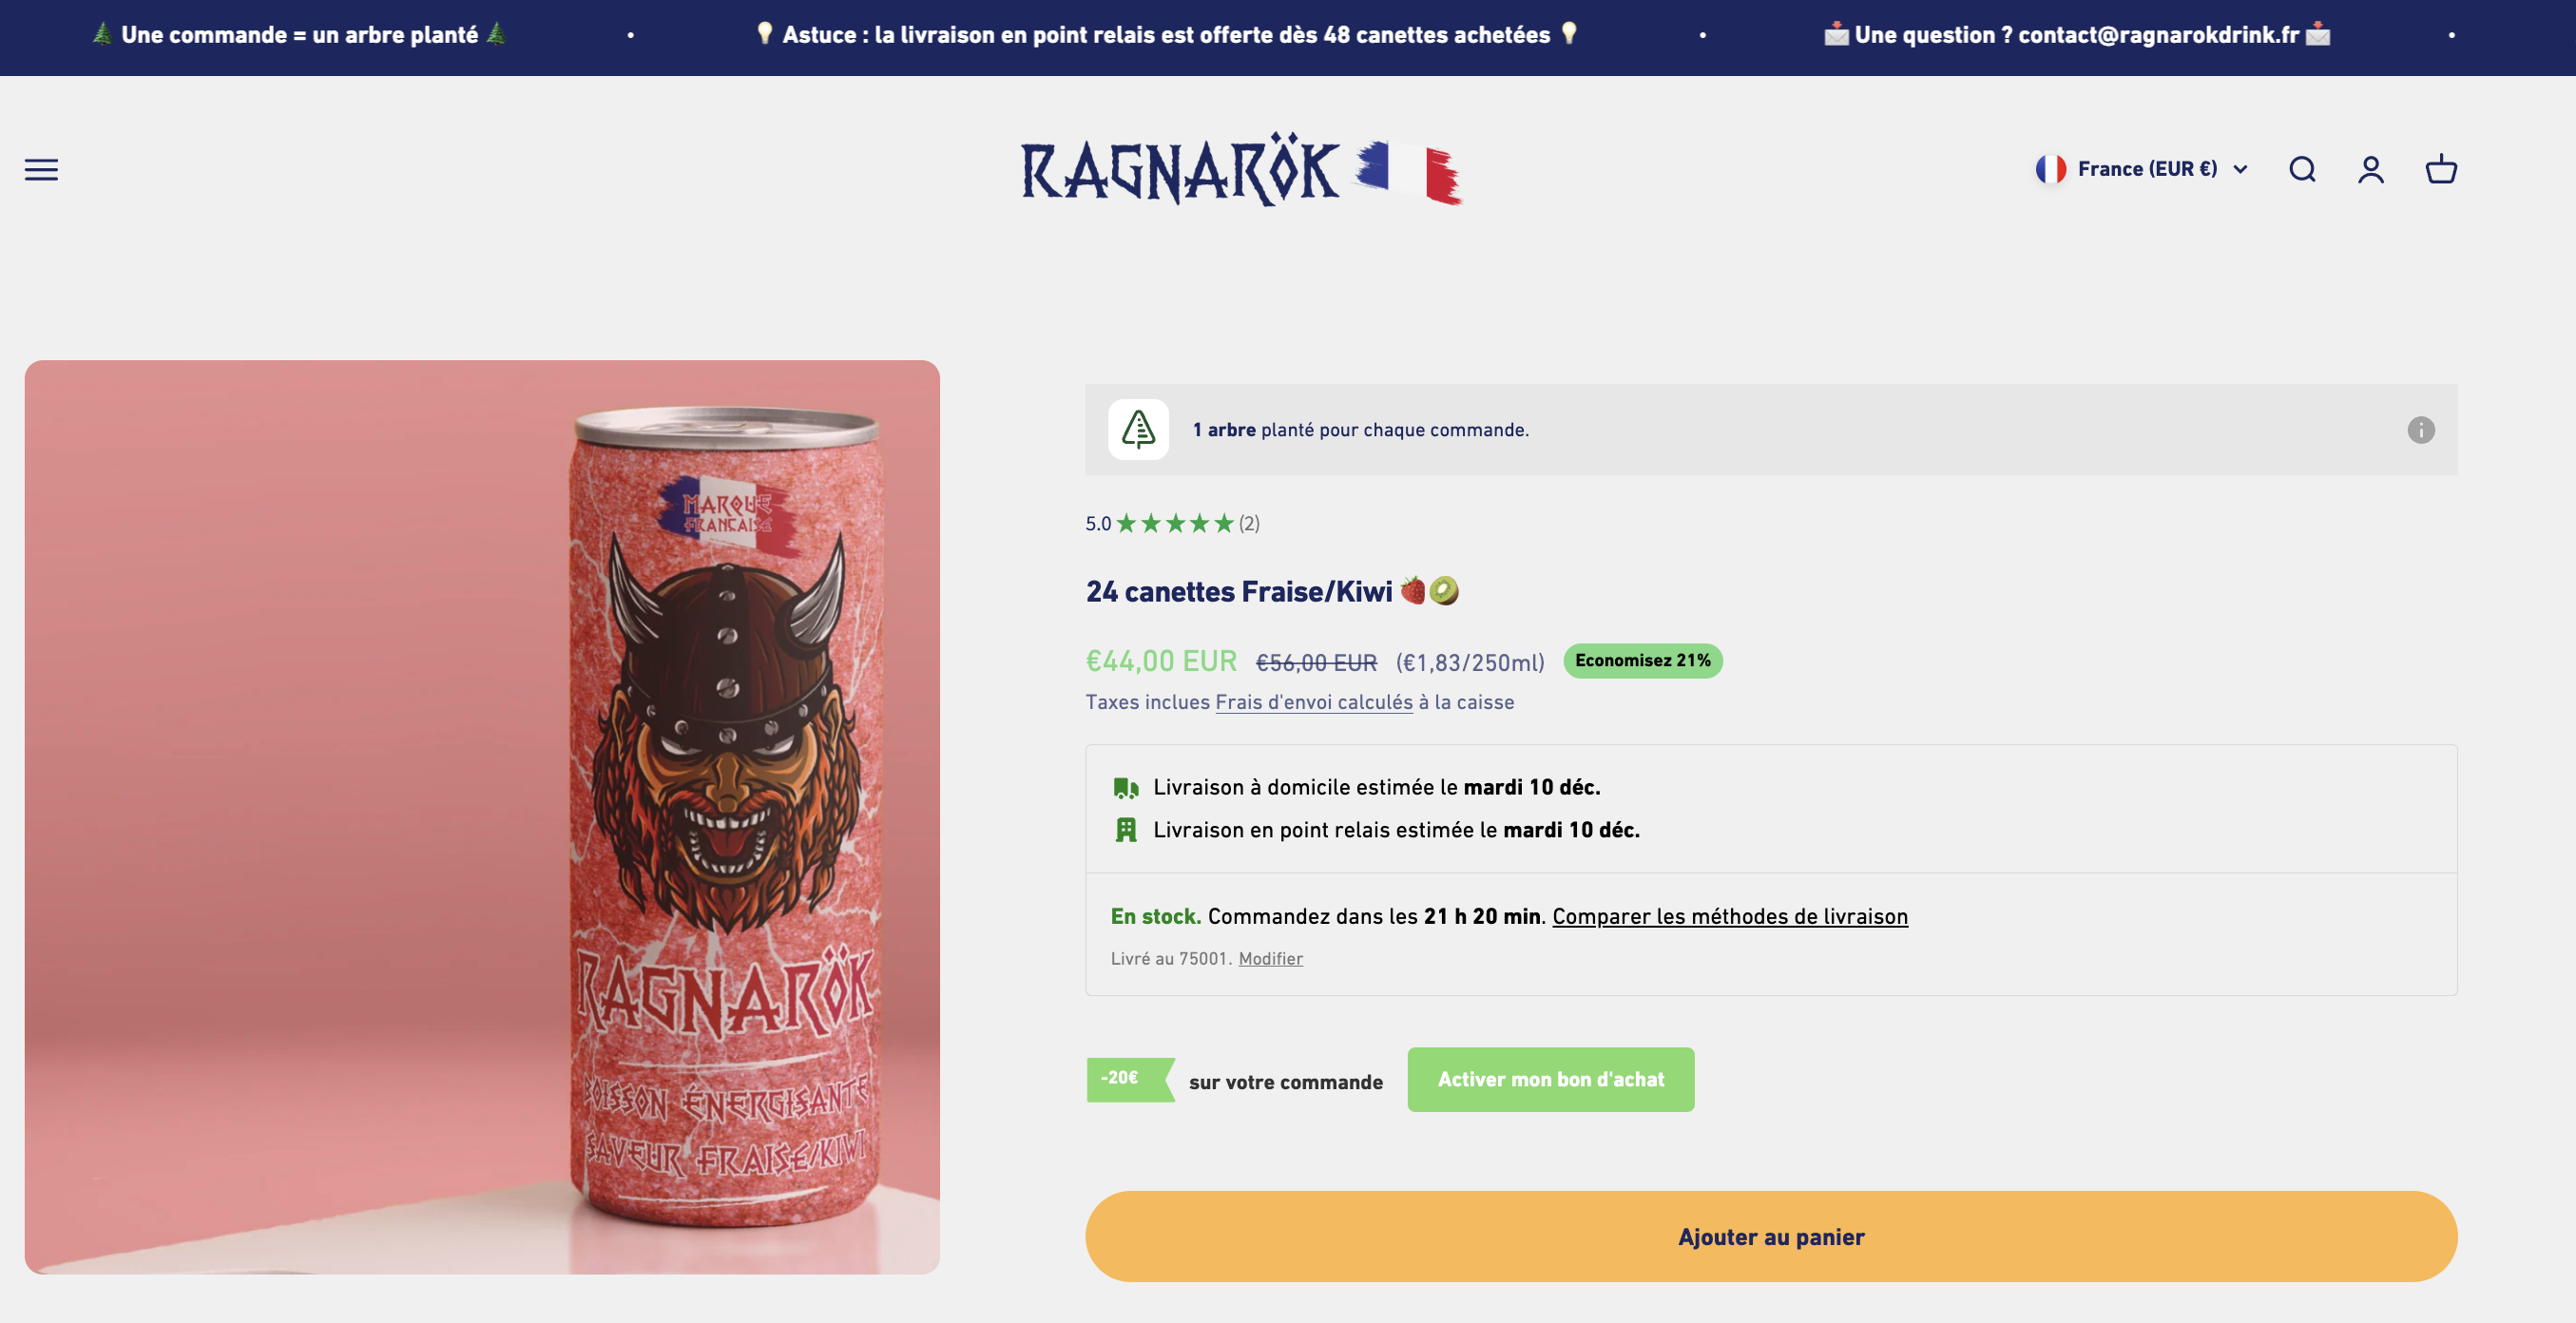
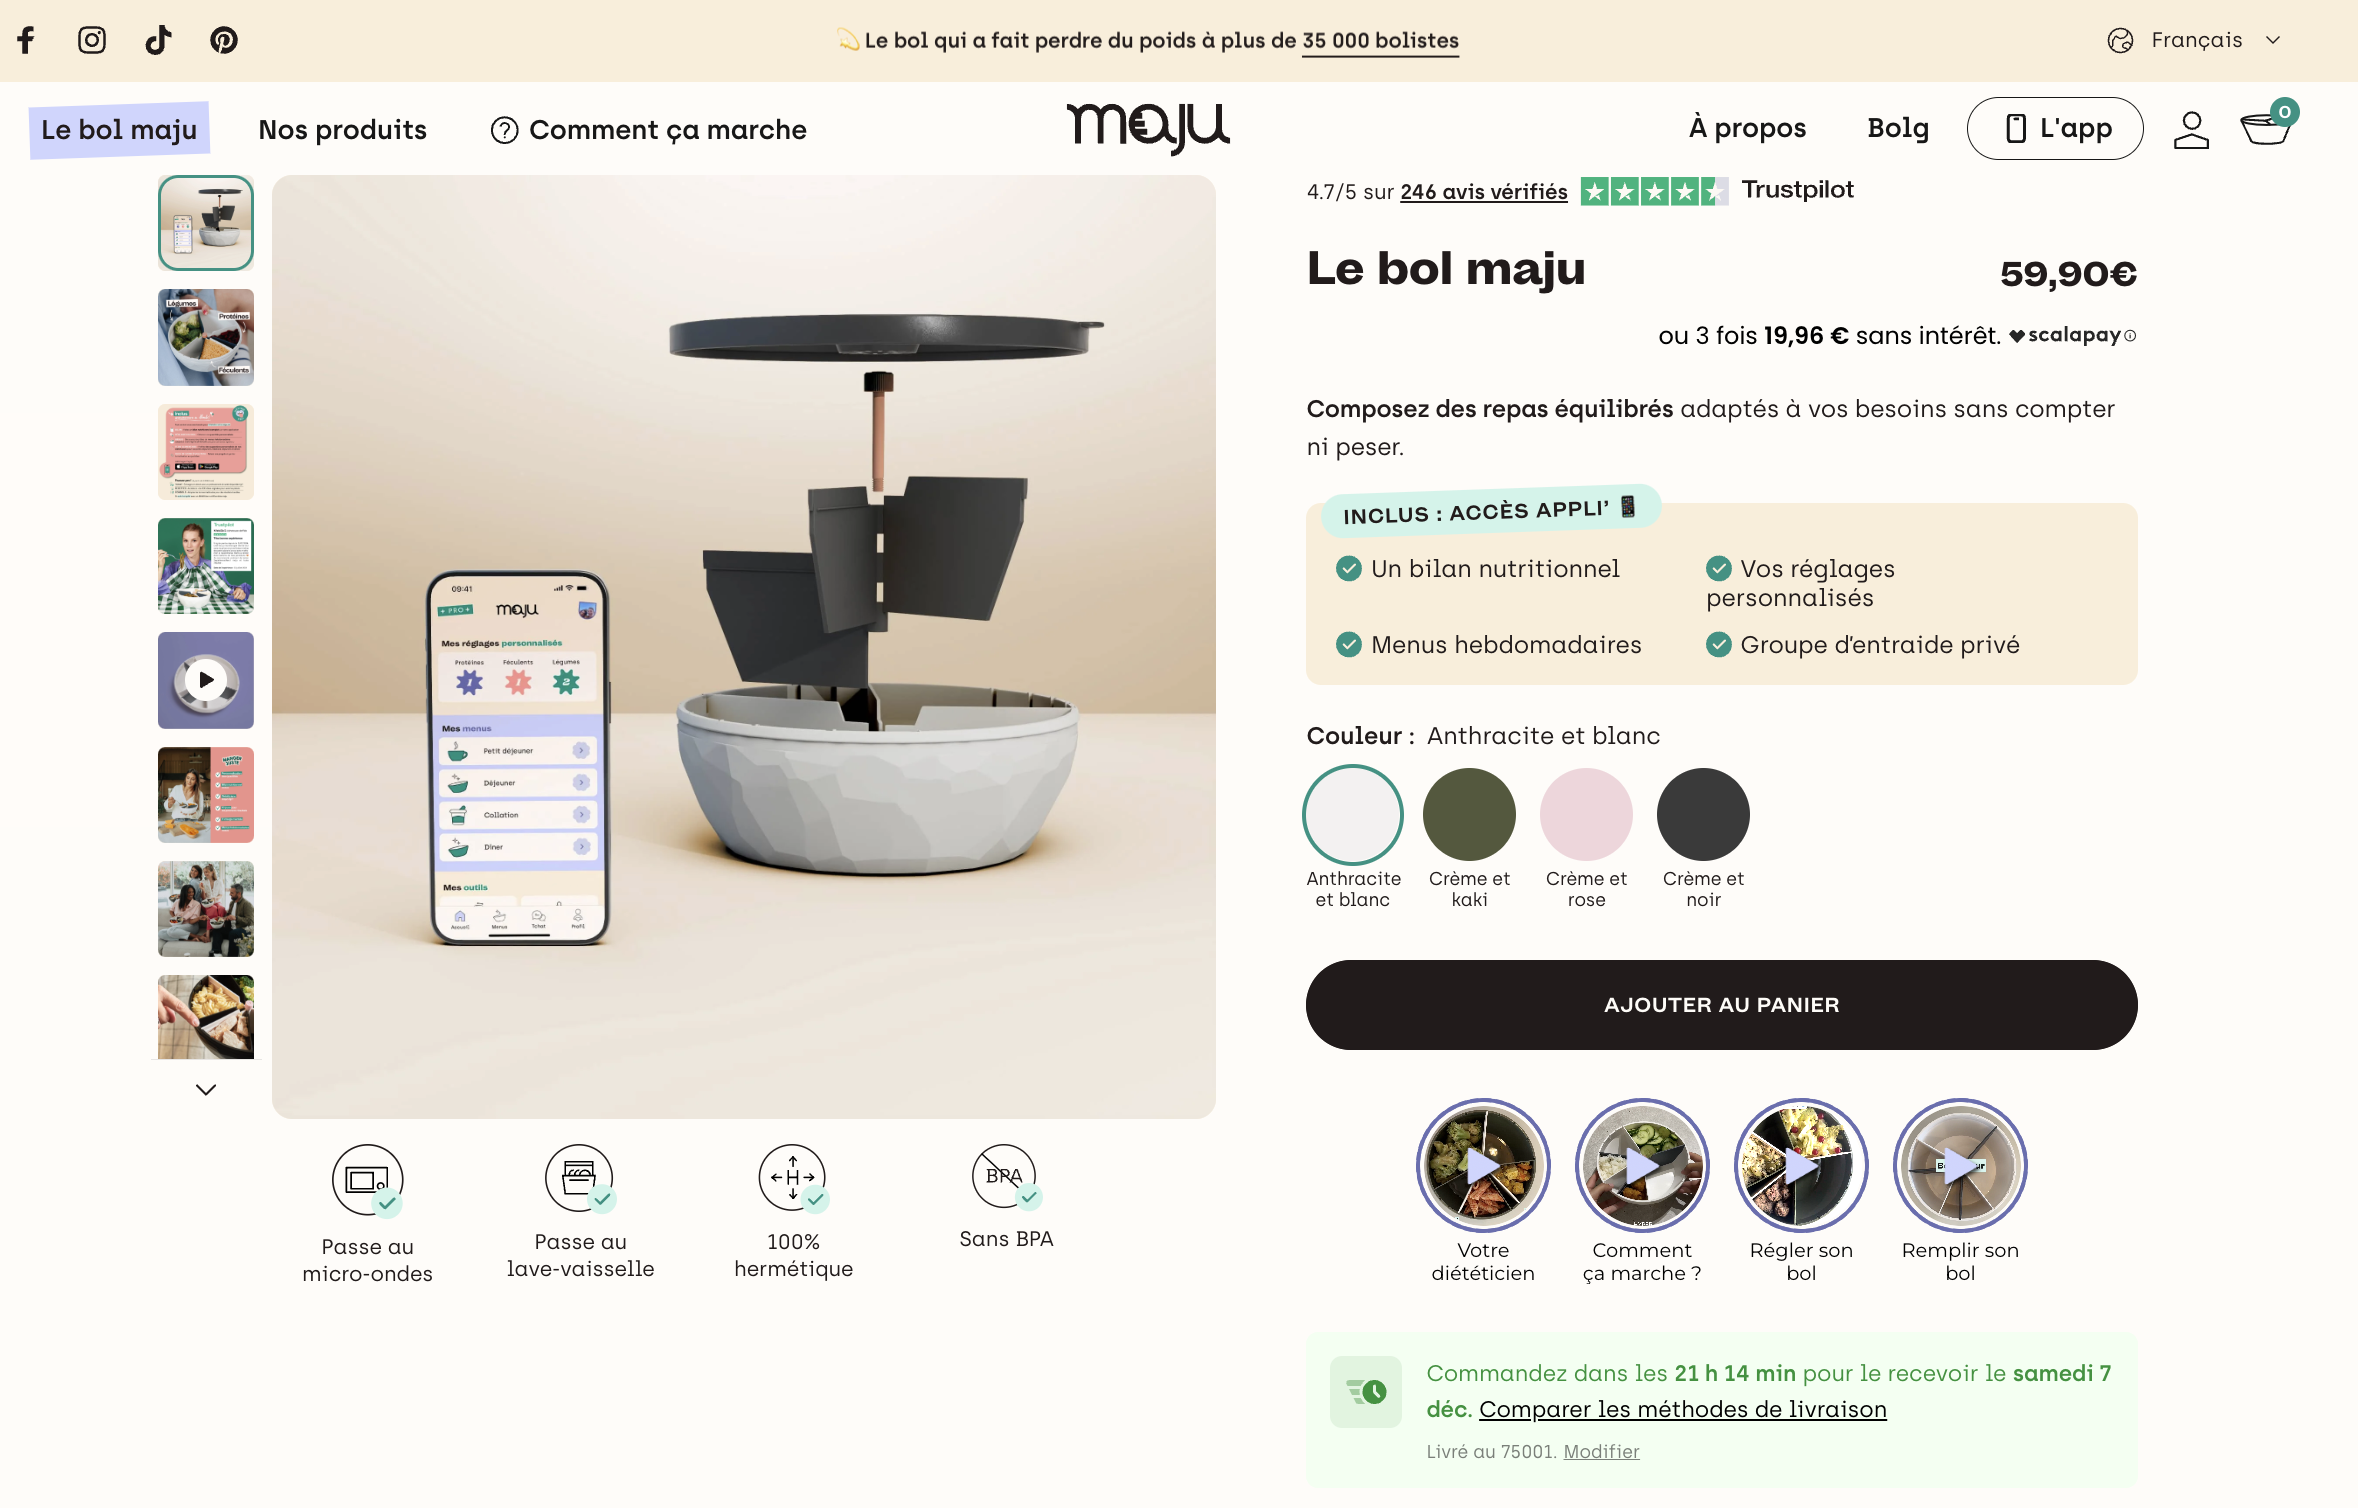
Automatic placement requires no experience in web development — activate Fast Tags in one click directly in the Bigblue settings. The badge is automatically placed before the 'Add to cart' button on product pages.
Manual placement
Manual placement allows users who have experience in web development to adjust the location of the Fast Tags, positioning it anywhere on your product page as desired.
The manual placement allows you to display Fast Tags freely on your shop, offering additional customization:
- Choose between 2 types of badges (Shopify only)
- Product badge: Offering a delivery promise for a specific product.
- Cart badge: Offering a delivery promise based on all products in the cart.
- Customize badge display to your preferences
- On Shopify, you can display Fast Tags badges on your pages exactly the way you want, allowing you to have a unique arrangement for each page.
- On WooCommerce, Fast Tags can be displayed on Product pages, Product lists and in the Cart.
⚠️ To place Fast Tags manually, Bigblue recommends that merchants get assistance from a developer, or has experience in editing their shop template.
c. Choose your Fast Tags setting and personalize your badge
After picking the badge placement, on the same page, you can choose what you want to display! Also, the badge is customizable and could match with your website’s branding.

- ETA display
- Show the fastest estimated delivery date: Insist on speed with a condensed badge displaying one promised date.
- Show all estimated delivery dates: Showcase multiple methods and highlight your delivery flexibility. You display an estimated date for each shipping type: Standard, Pickup, or Express.
- ETA source
- Condensed badge: you can decide to include or exclude Express or Pickup methods from the calculation of the fastest date. Use it to showcase ultra-fast delivery, or to manage expectations with a less aggressive promise date.
- All ETAs: you can decide which methods you display.
- Stock indicator
- If you select this option, the following message will appear on the badge: “In stock.”
- Note: the entire badge only appears for in-stock products. So this mention, and the whole fast tags, is only displayed for products with inventory at the warehouse (and not for backorders/preorders).
- Shipping countdown
- The shipping countdown option ('Order within 15 h 32 min…') will display the message throughout the whole day. Note: The part of the sentence is hidden above 24h to continue pushing for conversion
- Free shipping progress
- Promote your minimum cart value by showing this information, and boost your sales!

Go to the bottom section “Branding” to personalize your badge!
- Icon: show or not
- Accent & background color
- Corners: rounded or not

- Pick your settings
- Click on “Save” at the bottom of the page
👀 The right side offers a preview. We provide it to help you visualize how the Fast Tags will look on your website.

Please note that:
- The final font of the badge will be your store’s one
- The button “Add to cart” on your website could be different (text, colors) and the location of the tag could differ if you pick a manual location.
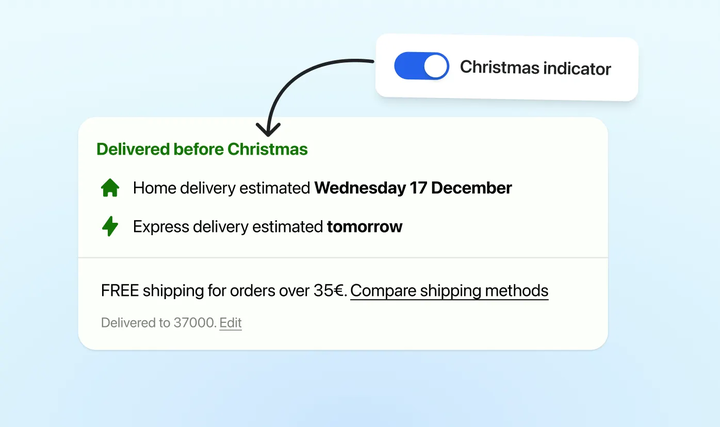
🎄 Christmas Fast Tag
You can now highlight guaranteed delivery before Christmas right from your Fast Tag settings.
Once the option is enabled:
- Your Fast Tag will automatically display a “before Christmas” mention all December long, until the 25th.
- The mention adapts to your current Fast Tag design (colors, icon, corners…), keeping everything consistent with your store’s branding.
- No extra setup or code needed — just toggle the option on.
For now, this feature only applies to Christmas. If you’d be interested in a Reyes Magos version, feel free to let us know!
d. [Woocommerce only] Install the plugin
On WooCommerce
Automatic placement on Product pages
To use this method, install or update the Bigblue WooCommerce plugin. Once the automatic placement is enabled, no additional action is required. The Fast Tags should be displayed on your site's product pages after a few seconds.
The injected tag is automatically updated when a different product variation is selected.
2. [Advanced Settings] Manual placement setup
On Shopify
Manual placement through code edition and theme customization
To manually add the Fast Tags on Shopify, please edit your Online Store Theme. You need to follow two steps:
- Edit your theme code to define the Bigblue Fast Tags block.
- Customize your theme to inject this block where you want to display a Fast Tags.
Product Fast Tags - Edit your theme code
To add a Bigblue Fast Tags block to your Product Theme Templates, go to Online Store > Themes, click on the dots and on Edit code

In your product page .liquid file, - named main-product.liquid , or something else, probably similar, - add the following pieces of code:
- In the
{%- for block in section.blocks -%}part, add the followingblock.typecase:
{%- when 'bigblue_fast_tag' -%}
  <bigblue
    data-component="fast-tag-product"
    data-product="{{ product.id }}"
    data-variant="{{ product.selected_or_first_available_variant.id }}"
  ></bigblue>

- Under the
{% schema %}part, define the fast tag block for your product pages:
{
  "type": "bigblue_fast_tag",
  "name": "Bigblue Fast Tag",
  "settings": []
},
- Save your changes
Product Fast Tag - Customize your theme
To add Bigblue Fast Tag blocks, go to Online Store > Themes, click on Customize
-
Select the Product Theme Template you want to modify

-
On the left, in the Product (information) part, click on Add block and choose Bigblue Fast Tag

- Drag and drop it where you want the Fast Tag to be displayed
-
Save your changes and go to your product page: you should see a Fast Tag!

🎉 You have successfully injected the Fast Tag on Product pages.


Fast Tag not appearing immediately? Both Shopify and Bigblue have caching systems to display either the fastest fast tag or all ETAs injection. To achieve optimal performance, these caches may need time to expire usually after waiting for up to 10 minutes. However, in most cases, 5 minutes is sufficient. If the issue persists and you still don't see the Fast Tag after 10 minutes, follow our troubleshooting guide.
Optionally, you can also use custom CSS to edit the Fast Tags.
Cart Fast Tag - Edit your theme code
Cart Theme are usually subject to more specific customisations, it’s frequent to have only a few sections defined in the code, that do not support custom block addition. Hence, we encourage you to approach your Theme developper team to identify the right .liquid file to update in your Theme code, something like cart_main.liquid or cart_page.liquid (not exclusive).
In that file, you can then add the following code where you want the Bigblue Fast Tag to appear:
<bigblue data-component="fast-tag-cart"> </bigblue>
☝ You’ve tried the set up and you don’t see a tag? See our Troubleshooting guide
On WooCommerce
Manual placement on Product pages
To add Fast Tags manually to your shop, you need to edit the PHP files generating your site pages. In the most common cases, they are available on /var/www/html/wp-content/plugins/woocommerce/templates .
- To display a Fast Tag on WooCommerce, add the following code snippet in the HTML code, replacing YOUR_PRODUCT_ID with a product ID, and YOUR_VARIATION_ID, if existing, with a variation ID:
<bigblue data-component="fast-tag-product" data-product="YOUR_PRODUCT_ID" data-variant="YOUR_VARIATION_ID"></bigblue>
- Depending on how you plan to inject this snippet, you may benefit from WooCommerce globals to automatically infer the product ID and variant ID of the product page. For example when editing short-description.php to inject a badge on a product with or without variations:
<div class="woocommerce-product-details__short-description">
    <?php echo $short_description; ?>
    <?php
    $product = wc_get_product();
    if ($product) {
        if ( $product->is_type( 'variable' ) ) {
            $childrens = $product->get_children();
            if ($childrens) {
                $defaultvariation = "";
                foreach ($childrens as $productChild) {
                    $defaultvariation = wc_get_product($productChild)->get_variation_id();
                }
                echo "<bigblue data-component=\\"fast-tag-product\\" data-product=\\"".$product->get_id()."\\" data-variant=\\"".$defaultvariation."\\"></bigblue>";
            }
            wc_enqueue_js("
                $( 'form.variations_form' ).on('show_variation', function(_, data){
                    var updatedVariation = data.variation_id.toString()
                    if( updatedVariation != \\"\\" ) {
                        var tags = document.body.querySelectorAll('bigblue[data-component=\\"fast-tag-product\\"]')
                        if (tags !== undefined){
                            for (var i=0; i < tags.length; i++) {
                                if (tags[i].getAttribute(\\"data-product\\") === \\"".$product->get_id()."\\") {
                                    tags[i].setAttribute(\\"data-variant\\", updatedVariation);
                                }
                            }
                        }
                    }
                });
            ");
         } else {
            echo "<bigblue data-component=\\"fast-tag-product\\" data-product=\\"".$product->get_id()."\\"></bigblue>";
         }
    }
    ?>
</div>
- Please get in touch with your administrator for more details.
☝ You’ve tried the set up and you don’t see a tag? See our Troubleshooting guide